To put it straight and simple, collapsible area is not a predefined screen element or GUI control but it is technique of putting multiple screens in right sequence.
The example which I am going to explain below has one input for material and two blocks representing ‘General data’ and ‘Dimention’ (similar to MM02). See screen shot below, for time being just ignore the comments on the screen.

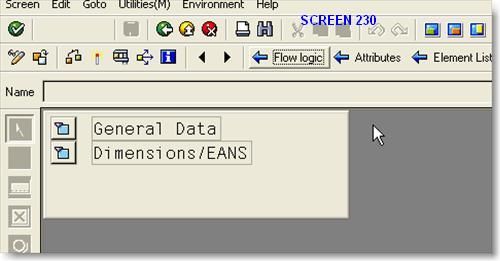
These two blocks are collapible area and to make it work there are 7 screens in total. Out of 7 screens 4 screens are just for layout which represent combination of collapsed and expanded area possible. Below are screen shot of these four layout screen. Each screen has subscreen area where the data will be loaded and a button. Note the icon of button, and the text next to it which helps the user to identify what is missing (collapsed) on the screen. Note thatn these screen are defined as Subscreen.
Both Open.

Top Open, Bottom Collapsed

Top Collapsed, Bottom Open

Both Collapsed

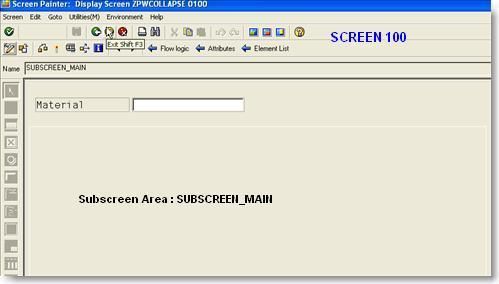
Then there is a main screen which will host all above defined subscreens based on user selection (there will be logic on user command). SUBSCREEN_MAIN is subscreen area defined on this screen.

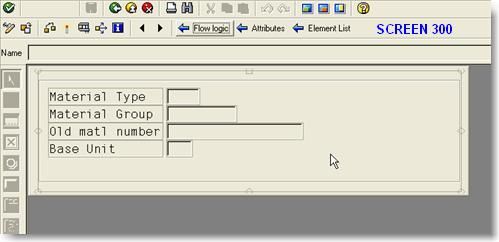
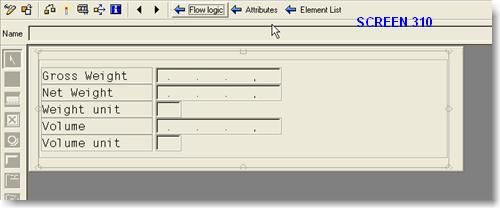
And as you might have guessed rest two screen are screens representing data.


Putting the screen together screen 100 is the main screen which will host one of the screens from 200, 210, 220 and 230 and these screens will in turn load screen 300 and 310 in them. You may like to revisit the first screen shot, it might make more sense now.
Ok that’s enough of explanation let’s start it.
1. Create a report in SE38. You can also create module pool program and then use transaction code to kick start program. Once report is create, I would suggest you to open report in SE80.
2. Add a ‘Normal’ screen, name it as screen 100. Add an input field MARA-MATNR and a subscreen area SUBSCREEN_MAIN. Put following code in flow logic tab.

3. Create a ‘Subscreen’, name it as 200 put two buttons and two subscreen area SUB1 and SUB2 as shown in screen shot above. Use icon ICON_DATA_AREA_COLLAPSE for push buttons. Assign function code ‘220’ to the button on top and ‘210’ to button in bottom. Put following code in the flow logic tab of screen.

4. Create a ‘Subscreen’ 210 as shown in snapshot above. Use icon ICON_DATA_AREA_COLLAPSE and ICON_DATA_AREA_EXPAND. Function code for buttons will be 230 200. Put following code in the flow logic tab of screen.

5. Create ‘Subscreen’ 220 as shown in snapshot above. Function code for button will be 200 and 230. Put following code in the flow logic tab of screen.

6. Create ‘Subscreen’ 230 as shown in snapshot above. Function code for buttons will be 210 and 220 respectively. Flow logic for this screen will be empty since there is no subscreen to load in it.
7. Finally define ‘Subscreen’ 300 and 310 as shown in above screen shot. Use fields from MARA. Flow logic for both the screen will be empty.
8. You need define a PF status ‘PFSTAT’ and Gui title ‘TITLE’ . Put BACK and EXIT function code in PF Status.
9. Put following code in report.
*&---------------------------------------------------------------------*
*& Report  ZPWCOLLAPSE
*&---------------------------------------------------------------------*

REPORT  zpwcollapse.

TABLES mara .
DATA : gv_screen TYPE char10 VALUE '0200' .

CALL SCREEN 100.

*&---------------------------------------------------------------------*
*&      Module  STATUS_0100  OUTPUT
*&---------------------------------------------------------------------*
MODULE status_0100 OUTPUT.
  SET PF-STATUS 'PFSTAT'.
  SET TITLEBAR 'TITLE' .
ENDMODULE.                 " STATUS_0100  OUTPUT

*&---------------------------------------------------------------------*
*&      Module  USER_COMMAND_0100  INPUT
*&---------------------------------------------------------------------*
MODULE user_command_0100 INPUT.

  CASE sy-ucomm.
    WHEN 'BACK' OR  'EXIT'.
      LEAVE TO SCREEN 0 .
    WHEN '200' .
      gv_screen = sy-ucomm .
    WHEN '210' .
      gv_screen = sy-ucomm .
    WHEN '220' .
      gv_screen = sy-ucomm .
    WHEN '230 '.
      gv_screen = sy-ucomm .
    WHEN '' .
      SELECT SINGLE *
        FROM mara
       WHERE matnr = mara-matnr .
      IF sy-subrc <> 0 .
        CLEAR mara .
      ENDIF.
    WHEN OTHERS.
  ENDCASE.
ENDMODULE.                 " USER_COMMAND_0100  INPUT
At this point your SE80 object list should look like this

Ok, that is all. If you now start you report/transaction enter material code in press enter, it should populate corresponding values on screen and then you can play with collapsible part of it. Enjoy!!
Some of the images have not been uploaded well, you can upload them again please. thank you very much
I’ll have to take screen shots again, if I still have access to server where I created this program. Let me find out. Thank you for feedback.
Kindly provide logic with full screenshots.