Over the course of Implementation you would define many customising tables. I am sure you will document them well but best place to place these customising is in SPRO. In this particular example we have implemented enhancement in shipment screen to make forwarding agent mandatory and there is a customising table which is defined to control on which shipment types this check will be active. Best place to put this customising table is SPRO under node where consultant will create new shipment type. This way, in future, when consultant create new shipment type they will also review if mandatory setting needs to be active on new shipment type created.
I am assuming you have already created your customising table and have a parameterised transaction which opens this table through SM30. You can refer this blog Defining Customising Table to which describes how to create customising table and parameterised transaction.
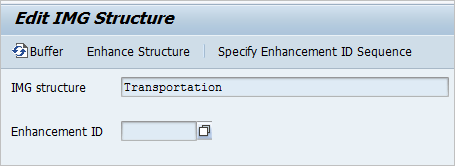
Go to transaction S_IMG_EXTENSION. In field IMG structure, select node which you want to enhance or change. I am going to add new node under Shipment type which is under Transportation structure therefore I have selected Transportation. Take value help on the field and select node which you want to enhance.

You need to select enhancement id or create new enhancement. I am going to create a new enhancement. Press F4 in Enhancement Id field and you will have this dialog box. Click on new button.

Specify enhancement id and description and press ok.

System should prompt you to save changes in transport at this point. You should have new enhancement id in enhancement list. Double click on this new enhancement id.

We have structure and enhancement id to work with.
If there are more enhancements to be made to transportation and if you think they can be grouped together you can use this enhancement in future instead of creating new enhancement id.
Press Enhance Structure.
Under the node ‘Define Shipment Types’ insert structure node using ‘Insert Structure Nodes at Same Level’ button from toolbar.

Specify Node text and press OK.

You should now have structure node. I am going to add activity node under this node which will then be linked to transaction. Use ‘Insert Activity as Subnode’ button.

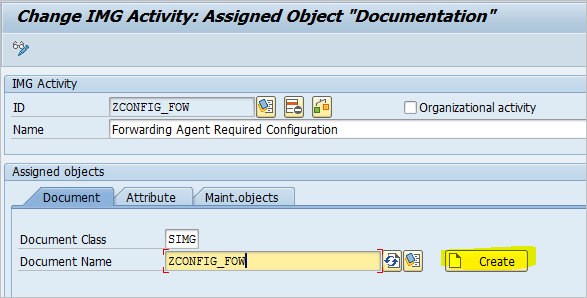
You will be presented with below dialog box. Specify ID, Name and create document. Well document is optional but it is good idea to create some document. Enter Document name and press ‘Create button’.

Once you have created document text press save and specify transport to save this change into (not screen shot for this step).
After saving text you will be back to screen where you have started. Go to ‘Attribute’ tab and specify Id name. Specify most appropriate ASAP Roadmap ID. I have selected 153 which is ‘Design enhancement’. In ‘Assign Application Component’ take F4 help and select application component. In this case I have selected Transportation which automatically brings code HLA0006575in.

Now go to maintenance tab and specify an ID again. Under ‘Customizing Object’ enter table name. Under ‘Type’ put S and then enter transaction. Incidentally, in my case table and transaction names are same, but of course it can be different.

After you save at this point, you are all done. Go back to initial screen and check the structure.

And of course check actual SPRO transaction.
The system automatically creates transactions for each node in SPRO. You can find out relevant transaction code in table CUS_IMGACH .

2 Replies to “Enhance SPRO Structure – Adding Node to SPRO”